Google Desktop on Linux

If you have ever used the default search that you find in the file browser of Ubuntu or even the “find/whereis” function from the terminal you know that it can be very frustrating trying to locate a specific file on your system. Although, there are several utilities already available for Linux users to simplify and speed up file searches, I had not yet seen one that integrated searching files, documents, webpages, images and online videos all at the same time until Google released Google Desktop for Linux. This new app gives you all of the functionality mentioned above and is very customizable with minimum intrusion. There are two easy methods for installing Google Desktop.
- Download the .deb here.
- Add the Google repository to your list of repositories (instructions).
I recommend the second option since this will provide you with access to the latest Google software when it becomes available as well as notifying you as soon as important updates become available.

Once you install Google Desktop and reboot, the application will autostart and begin indexing various folders on your HD. What’s nice about Google Desktop is that you can specify which locations you want to allow the application to index and which folders should be ignored. To do this, just launch the preferences window using the icon in the Gnome Panel. Another aspect to take into consideration is the amount of resources an application like this uses when indexing. Some other search apps for Linux can use 50+MB for search while I have not yet seen the Google Desktop search peak above ~15MB. The only drawback I see to this program is the load time associated with launching Firefox to view “all results” (top results appear in a quickview window). Follow the links above to check out test drive the software for yourself.
Filed under: desktop, google, linux, ubuntu | 5 Comments
Enabling Audio in VMware Server

In my previous post I showed you how to emulate an existing Windows install in Linux using VMware server. Now that you have your Windows OS running and you can run all your basic apps, it’s time to improve the functionality of your virtual OS by adding sound so that you can listen to music, watch videos, play games, etc. By default sound is disabled in the guest OS and I have read several websites that claim it is not possible to get sound working in VMware server. On the contrary, it is very easy to setup audio in the latest version of VMware Server. The following steps will show you how this can be done.
- Launch VMware as root: [gksudo vmware]
- Open the virtual machine you want to add sound to (the machine should not be powered on, if it is, shut down).
- Click “Edit virtual machine settings.
- Under the Hardware tab click “+ Add”.
- Choose “Sound Adapter” and click Next.
- Select Auto Detect from the drop down menu.
- Make sure “Connect at power on” is enabled.
- Click Finish.
Power on your machine and login. If you have VMware Tools installed, Windows should automatically detect your virtual audio drivers. You should now be able to hear audio and system beeps. You can also control the volume using both Windows’ volume control and any hardware volume control buttons you have. Keep in mind that the volume in your Guest OS is dependant on your Host OS. That means if your volume is muted in Linux, you will not hear anything in Windows even if you set Windows’ volume to max. Additionally, if your volume in Linux is only set to halfway, the loudest you can hear anything in Windows will also be halfway.
Additionally, if you want to enable the use of USB devices in your Guest OS, follow the same method as above and choose USB controller instead.
Filed under: dual boot, linux, ubuntu, virtualization, vmware, windows | 21 Comments
I promised before that I would do a write up of a simple way to run an existing install of Windows XP from within Linux. Many people run a virtual Windows install from within Linux which is pretty good but is sometimes a burden if you have an existing physical Windows install because you now have 3 operating systems that you need to move files across and most people want access to the same programs and settings in their virtual install of Windows as they have in their physical install. The process I outline below will be useful for Linux users that have an existing dual-boot setup and want the capability to access their existing Windows OS without having to go through the tedious reboot process.
As an engineering student using Linux, I have realized that some of the programs I need to use like Maple, Matlab, SolidWorks, etc. (I will show you some good alternatives to Maple and Matlab in a later post) are not available for use in Linux. This became quite annoying when I was constantly rebooting my computer and switching OSes. One solution to my problem was to create a virtual copy of Windows XP. I didn’t like this idea because it would require wasting double the hard drive space that the Windows OS files need, reinstalling all the software I need and configuring everything to the right settings. So I began searching for ways to virtualize an existing Windows partition and came across this site: Blackmh. Although this guide provides a lot of useful information for getting started, it did not work on my laptop (might work on yours) . Additionally, I figured many users don’t want to mess with figuring out the location of cylinder heads and what not, so I put together this guide that will help you quickly and easily setup your system.
1. Installing VMware:
The easiest way to do this is by using the Automatix installer. If you haven’t already installed Automatix, download and install it from here: Get Automatix, the install is very straight forward. Once, you have Automatix installed, run it and go to the Virtualization category. Here you want to select VMware Server and hit install and Automatix will take care of the rest.
2. Configuring VMware:
You need to run VMware as root so in the terminal window type:
gksudo vmware
You will now be prompted with the VMware Server Console. Make sure that “Local host” is selected and choose “Connect”. For easy setup, use the Virtual Machine Wizard by clicking on “Create a new virtual machine” and going through the following steps:
- Next
- Custom, Next
- Microsoft Windows (Choose Version, I use XP Professional), Next
- Choose a name and location, the default values are fine, Next
- For Processor Configuration I chose One Processor so that one core would be dedicated to each OS during virtualization, you can change this later. Next
- Access Rights did not make a difference, I did not make my machine private. Next
- Specify the amount of memory you want to allocate to the Guest OS. I dedicated half my memory, 512MB. However, when running simulations or using apps like SolidWorks it feels very slow so I plan to pickup 2GB after work tomorrow. Next
- For your Network Connection I recommend you use NAT (network address translation). This will be the easiest configuration since you will be sharing the same connection among both OSes. Bridged will allow each OS to use a separate connection but requires further configuration that I will not get into here. Next
- Choose BusLogic as your SCSI adapter. Next
- Choose “Use a physical disk”, Next
- Your “Device” should be the main disk that contains both your Linux partition and your Windows partition. Select “Use individual partitions”. Next
- Here select both your linux and windows partition (swap isn’t needed). Your linux partition is needed since only the first stage of GRUB resides on the MBR and GRUB will try to access your linux partition to load stage 2. Next
- Choose a Disk Filename, the default is fine. Finish
3. Configuring Windows
Before starting up your virtual machine follow these steps, I copied them from Blackmh’s site:
"Now reboot into Windows and set up another hardware profile for Vmware.

Start-> Control Panel-> System, click on Hardware tab and Hardware profiles. You will find Profile 1 (Current), highlight it and click Copy, give it new name, Vmware for instance and move it up.While at Hardware tab in System properties, you can disable driver signing.
One more thing to do. As you may know, work in Vmware machines is easier with Vmware tools. I took Vmware tools installation out of Vmware Server to spare you of downloading 100 MB + file and you can download it here. Unpack archive and put it somewhere on Windows partition."
While you are in Windows I recommend you install the SCSI drivers for the virtual SCSI controller that VMware uses. This is necessary because VMware acts as a virtual computer with virtual hardware. Windows has the drivers it needs to operate on your system but by running it in VMware you are virtually unplugging your HD and plugging it into a computer with different hardware specs. This can pose a problem when Windows can not find drivers to access the HD (since VMware uses a SCSI controller) and you will be presented with a BSOD error 0x0000007 on startup. You can either follow the Microsoft Knowledge Base article and try to work around this problem (I’ve seen little success) or you can follow my method:
- Download the VMware Server SCSI floppy image (I’ve extracted the files into a ZIP if you don’t have a floppy drive)
- I made a video of the driver install process that you can follow:
Installing VMWare SCSI Drivers
Click “Next” and “Finish” where the video leaves off.
Now reboot into Linux.
4. Getting ready to run the Virtual Machine
Launch VMware as root as explained above and choose local host. There should be a tab for the virtual machine you created earlier, select it.
VERY VERY IMPORTANT: Before running your virtual machine, ensure that your GRUB timeout is not set to zero. You can change the timeout by accessing /boot/grub/menu.lst and increasing the “timeout” value. Refer to my post on the GRUB Menu for more information. If you leave this value as zero, it is very likely that GRUB will automatically run Linux when you first start up. You should ***NEVER VIRTUALIZE YOUR CURRENT LINUX INSTALLATION***. This will corrupt your linux install and make it unusable. With that said, I will show you a way to avoid the GRUB menu all together later in this post.
Once you have ensured that your timeout is not set to zero and GRUB will give you time to choose the OS you want to boot go ahead and click “Power on this virtual machine”. The console screen should open up and you will see your computer booting up. Once this is done the GRUB menu should load and you can choose your Windows install that you want to boot.
At this point you will either be given a choice of which hardware profile you want to boot into (choose VMware) or your screen will hang at “Starting up…”. In my case it hangs at starting up. This had to do with the location that the windows boot files are located on your hard drive and the fact that GRUB did not point to the correct location.
Don’t worry there is a solution that I recommend, even for users who can successfully boot into Windows. Reboot your computer into Windows and use your Windows install CD to make a boot CD image. If you don’t know how to do this, google it, there are many guides explaining it. However, if you are using Windows XP Pro (may work for home), I have a boot disk image that you can download. Save this file to disk and note where you saved it.
Now in VMware you should be at the virtual OS summary screen. Towards the middle right you should see “Devices”. Double click on CD-ROM and under connection change the setting to “Use ISO image”. Click “Browse” and select the file you just downloaded or the boot image you made yourself and click OK. At this point, if your BIOS is setup to boot the CD first before any other device, VMware should automatically boot windows and never even enter the GRUB menu, saving you from accidentally booting your current Linux OS. If your BIOS is not setup to do this, Google how to do this for your specific computer.
You should now be good to go. You can power on your virtual machine and Windows should boot by default. Select the VMware hardware profile and the first time you run windows you may be asked to reactivate Windows. This is because Windows has detected your hardware having changed (VMware’s virtual hardware). The activation process is very simple and straight forward and you should not be asked to activate again when you do a physical reboot into Windows. The first time you login you will be bombarded by “Found New Hardware” screens. Ignore these and just run the VMware tools you downloaded earlier. Perform a virtual reboot and all your virtual hardware will be detected.
You can now use your existing Windows install from within Linux!
Here are a few screenshots of Windows running in Linux:
OS & Browser Detect page shows WinXP & IE7:

Beryl & VMware:

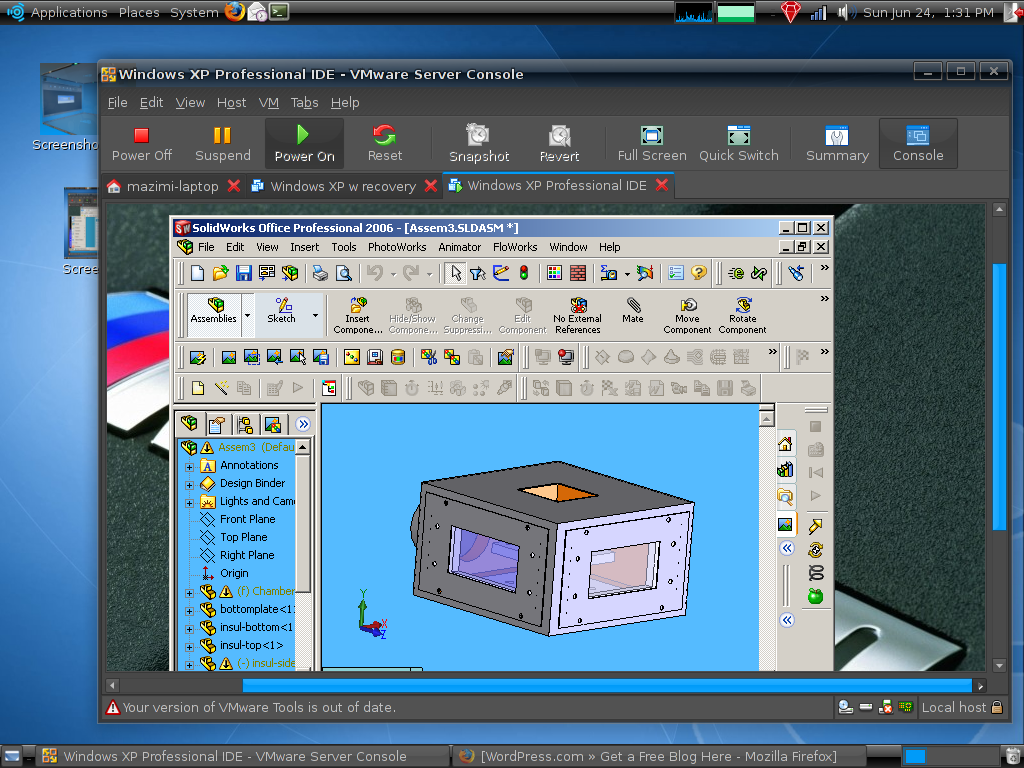
SolidWorks Running in Linux (emulated):
If you have any questions you can post a comment. I will do my best to answer them.
WARNING: I am in no way a computer engineer, the guide provided here is intended for people who know what they are doing, don’t blame me if something gets messed up.
With that said, I think the best way to learn is to backup any important data you have and not be afraid of having to reinstall the OS as long as you achieve your goal and learn something at the end of the day. This guide worked on a Thinkpad X60.
Filed under: dual boot, linux, ubuntu, virtualization, vmware, windows | 104 Comments
![]()
When thinking of Intel and operating systems, one of the first thoughts that comes to mind is “Wintel”; Intel computers running Windows. Nevertheless, Intel has been working very hard over the past years to get away from this image as much as possible and this involves giving the Open Source community full support. Whether it be in the form of providing hardware specifications ahead of a product release, developing drivers or helping develop kernels to improve performance, Intel is there backing Open Source.
It seems clear that Intel sees great opportunities when it comes to Open Source through their support of the community here as well as their efforts to promote its use globally. Take a look at Intel’s Software Network page dedicated to Linux and Open Source. Here you can find plenty of tools and resources that have improved open source development along with drivers for the latest Intel hardware.
However, the main highlight of this post is to give you something to really look forward to in the next release of Ubuntu, Gutsy Gibbon. As you may know, this latest release (due out October ’07) will include kernel 2.6.22-6.13. What exactly does this mean? This means that if you are running an Intel processor along with the latest kernel (2.6.21+), the CPU no longer has a fixed 1000Hz timer tick (dynticks). This will allow your CPU to go into even deeper idle modes where more power is saved.
Unfortunately, certain applications and processes don’t allow your CPU to achieve this deeper level of idle which results in more power usage and higher temperatures. Fortunately, Intel has developed software called PowerTOP designed to tell you which processes are using the most power to help you better manage your system’s power consumption:

These developments will be welcomed by all users but especially those that run linux on their laptops and are looking for better battery life. It’s important to realize that there are dedicated teams of software developers at Intel working to improve both the performance and power consumption of our computers despite the fact that we don’t use the most mainstream OS.
In the end, it’s nice to see more support for linux from the hardware industry. Hopefully the steps that Intel has taken will show other hardware manufacturers that linux users are an important demographic and that their support for open source in the form of software and drivers is needed.
If you want to start increasing your battery life before Gutsy Gibbon is released, check out this blog.
Filed under: battery, dynticks, gutsy gibbon, intel, kernel, linux, open source, performance, powertop, ubuntu | 4 Comments
Check out this video of the latest features to be added after the Compiz/Beryl merge. The effects look stunning, especially the cube reflection, very clean.
Filed under: beryl, compiz, desktop, linux, ubuntu | Leave a Comment
Tethering a Sumsung BlackJack

If you’ve had a Windows Mobile phone in the past you probably know that it can be a pain to tether your laptop to use the internet connection since you usually have to treat the phone as a modem and dial the access number, etc. With the Samsung Blackjack, this process is a piece of cake and has been simplified into 4 easy steps:
- Connect your phone to your laptop using ActiveSync.
- On your phone, launch “File Explorer” and navigate to the Windows folder.
- Launch the application named “Internet Sharing”.
- Choose “USB” as your connection and hit “Connect”.
That’s it. Just launch your internet browser to surf the web or open Outlook to sync your emails.
I have read that this is not against your user agreement from T-Mobile and I do not know anyone who has the Total Internet package and has been charged for tethering their phone. However, this is only allowed on certain plans for AT&T so consult your user agreement before you go racking up a huge phone bill.
Filed under: 3G, blackjack, cell phone, EDGE, laptops, notebooks, samsung, smartphone, t-mobile, windows mobile | 5 Comments
![]()
I have a couple friends looking to buy new laptops right now who want to know what laptop is the best deal. With technology changing so fast, it’s hard to keep up with the latest and greatest in the PC market. One of the key aspects of the PC industry that has revitalized the market is Intel’s new found energy in technology development. Intel today is a much leaner company than it was a few years ago with a new roadmap that emphasizes technology development. All this in turn means that Intel is now a more agile company with a goal to have more frequent product/manufacturing refresh cycles and to stay ahead of the game.
As a result of this updated product refresh cycle we have seen Intel pump out many new products, technologies and useful features since the introduction of the Core architecture and the latest one can be seen in the new Centrino Platform, codenamed Santa Rosa.
The benefits of Santa Rosa (GM965 Chipset) are numerous. The following are key technology enhancements that will help you in every day computing:
Performance:
- 800MHz Front Side Bus (increased from 667MHz) = Faster data flow and overall improvement in performance.
- SmartCache = Since many applications only utilize 1 core, SmartCache allows that one core to take advantage of the full 4MB L2 Cache rather than just half of it as other processors do.
- Dynamic Acceleration = When only one core is in use, the speed of that core is increased and the power to the other core is reduced to help improve performance with single threaded applications.
- GMA X3100 Graphics = Best integrated graphics solution from Intel yet. DirectX 10 compliant making it capable of running Vista’s Aero or other GPU intensive tasks.
Power Savings:
- Scalable Front Side Bus = FSB can be scaled down to lower frequency to save power when not in heavy use.
New Features:
- Wireless WiFi Link 4965AGN = Integrated 802.11n (MIMO) wireless radio allowing for faster and longer range wireless data transmission.
- Turbo Memory = Either 512MB or 1GB of NAND flash memory used to store the computer’s most commonly accessed files in order to improve boot time, application performance and reduce power consumption through less hard disk access.
What’s important to realize here is that there has been a large amount of technology output at once and that it will take the software side some time to catch up. For example, initial benchmarks of the X3100 failed to show the performance enhancement but news sources reported today that a final release of the drivers is on the way that should fix existing issues. Additionally, the only operating system that can currently take advantage of Turbo Memory is Windows Vista, so if you are using Linux as your main OS, you will not see any performance enhancements until drivers are released. However, knowing Intel’s close relationship and support of the open source community, it is very likely that drivers for these OSes will show up soon.
Regardless, there is no question that Intel’s new Santa Rosa platform is the latest and greatest when it comes to laptop technology and the new features introduced here make for a great product that will provide you with an excellent computing experience in the form of improved perfomance and reduced power consumption for some time to come. Looking at what Intel has planned for the next product refresh (code named Penryn and Montevina) we can see that the next major product updates involve Intel moving to a 45nm manufacturing process and the introduction of integrated WiMax radios. Although these are huge feats in themselves and show Intel’s vast lead over the competition, as a general consumer or even an enthusiast it seems safe to invest in a new laptop now without missing out on too many new features in the near future.
With that said, just look for the new Centrino Duo logo when looking for a Laptop with the Santa Rosa platform. When deciding which laptop is for you, I suggest reading some reviews from reputable sources. One of my favorite sites is http://www.notebookreview.com/. If you are looking for a good all around laptop with this new technology, I highly recommend the Lenovo Thinkpad T61. If you have a little more to spend and are looking for a more ultraportable solution, check out the Thinkpad X61, you won’t be dissapointed.
Filed under: cpu, intel, laptops, mimo, notebooks, santa rosa, thinkpads, turbo memory, x3100 | 3 Comments
![]()

If you want to get more use out of your Samsung BlackJack there is a quick and easy way to do this. If you do not use the 3G network (Pretty much any T-Mobile users using the BlackJack and many AT&T users) you can disable the 3G connection altogether.
To turn off 3G do the following:
- Type in the code *#1546792*# on your handset
- Choose the 3rd setting “Network & Call Settings”
- Choose the 5th option “Network Mode”
- Choose the 2nd option “GSM” andhit OK.
You can always revert to your original settings by repeating this process and choosing “Auto”, however this small change should give you better battery life.
Filed under: 3G, battery, blackjack, EDGE, samsung, t-mobile | 1 Comment
![]()
At least that’s what Apple claims (http://www.apple.com/macosx/leopard/features/bootcamp.html) on their bootcamp website. When Apple unveiled Leopard they introduced a concept called “Fast Switching” (Google cache of Apple’s site: Image) but when you visit the same site now, there is no mention of this fast switching. So what’s the big deal here? How is Leopard the most advanced OS when there is nothing special about Bootcamp that makes it superior to say, oh I don’t know…Linux??? So you can run Bootcamp and dual boot into Windows and other OSes. Big deal. Linux users have been doing this for ages.
So one of the big selling points of this new “Fast Switching” was to allow Bootcamp and Parallels to work together and allow users to boot into physical partitions. This essentially means giving users the ability to boot into a Windows Partition or to emulate it in OSX. From what I have read in the Mac community forums, this capability was not possible before:
“3. As far as I know, Parallels cannot using an existing physical partition to run its virtual machine, but VMware has limited support for doing that. I wouldn't do that on a known good installation unless you are willing to create a separate hardware profile in XP to compensate for the fact that the virtual machine hardware profile will be significantly different from the actual hardware profile.
For the Mac, Parallels is about the only option for virtualization. VMware has a beta version of its product for the Mac, but it has not been publicly released.” – (Source) Post #2
So from what I understand you CAN NOT boot into windows AND emulate the same windows partition inside of OSX.
However, take a look at the following image:

This is an existing Windows partition booting up under LINUX, the world’s most advanced operating system.
I will post a guide on how to do this in a following blog. It is important to realize that OSX is in fact a UNIX based OS and that is what allows it to perform as well as it does. I feel that Apple never gave the open source community the recognition they deserved for all the work that was done towards what has gone into OSX. I think one main reason that Apple fails to give recognition is that they realize there are better OSes out there that give users more freedom and capability. I am not the only person to have realized this:
"It wasn't until later, giving the same presentation at Linux World that I'd missed giving at the Apple show, that I realized that Apple were scared of the SuSE Linux desktop I was using. They didn't want customers to see anything other than Apple-badged everything at their show. Especially if it was something better. They were scared of their customers even seeing a choice." – Source
The argument of Mac vs. PC is dead. There is no such thing as a “Mac” being sold anymore. Apple is now using Intel CPUs running a UNIX based OS which makes them in fact a PC manufacturer as well. Don’t go around claiming your Mac is better than PCs unless it runs on a PowerPC processor. It has really come down to various PC manufacturers making a similar product but the user having the choice of many operating systems. In the end I think all OSes are needed, some are better than others when it comes to certain tasks, but when it comes to performance, reliability and security certain OSes perform much better than others.
Filed under: Apple, bootcamp, dual boot, Leopard, linux, Mac, OS X, parallels, ubuntu, vmware, windows | 1 Comment
Free 411 from Google
![]()
If you’re still paying for directory assistance it’s time to stop. These prices are what some of the top carriers are charging for 411 usage:
Verizon: $1.25
T-Mobile: $1.49
AT&T: $1.50
Sprint: $1.79
Frankly, you should be putting that money to better use because there is a better solution. Up until now one of the best solutions was to text message google with your search query. So say you were looking for T.C. Luigi’s Pizza in Chandler, Arizona; you would text message that string to ‘466453’ (Spells out GOOGLE on your keypad). But for those who are more comfortable with the traditional voice based 411 service (or when you are using a landline), Google now has you covered.
To get free directory assistance anywhere in the US just dial 1-800-GOOG-411 and you will be connected to Google’s directory assistance. Google’s excellent voice recognition software will ask you for the city and state, at which point you can say it or spell it out with your phone’s keypad. You are then prompted for the listing you would like to find. Once the right listing is found you can be connected free of charge or say “text message” to receive the information as a text message on your phone. Visit http://labs.google.com/goog411/ for more info.
Check out the “cheat sheet” for cool tips and tricks on how to better use the system: http://labs.google.com/goog411/shortcuts.html
From my experience, this service works very well and is very convenient. For more convenience you can set this number in your speed dial. The best part is it’s free and Google doesn’t sell your phone number or information to third parties.
Filed under: 411, cell phone, free, google, phone | Leave a Comment
Clean up your GRUB

If you dual boot or multiboot your computer with linux and other operating systems, chances are you are using GRUB (GRand Unified Bootloader) to select which OS will be launched. GRUB resides in the first 512bytes of your hard disk (also referred to as the MBR – Master Boot Record) and is the first process that loads after your BIOS.
Since 512bytes is not enough to contain all of GRUB, the majority of the application resides on the linux partition under /boot/grub (GRUB Stage 2). This is where you can change how GRUB looks and behaves. Looking at the files in this directory you will find one named “menu.lst”. To edit this file, you will have to open it as root:
$sudo gedit /boot/grub/menu.lst
Here you will find several customization options available for getting GRUB to look and act exactly the way you want it to. This page is an excellent resource on how to customize GRUB. It shows you how to change default OS, timers, adding a splash image to the GRUB menu, adding color to the menu, setting passwords and much more.
Over time, Ubuntu will present you with kernel updates through the update manager that will all be added to your GRUB menu list. This can become very annoying after 3 or 4 kernel updates because you now have 2 GRUB entries for each (main and recovery mode) kernel which will result in a cluttered GRUB menu. To remove unwanted kernels from your GRUB menu, open the “menu.lst” file with root privileges (as described above) and scroll to the very bottom of the file. Everything after the line below is used to configure menu entries:
## ## End Default Options ##
You should see the latest kernel version as the first entry followed by recovery mode for that kernel. If you do not use other kernel versions, you can go ahead and delete the blocks of code associated with these kernels such as:
title        Ubuntu, kernel 2.6.20-15-generic

root        (hd0,4)

kernel        /boot/vmlinuz-2.6.20-15-generic root=UUID=8d5c365a-5816-405d-a910-6604c4bbf973 ro quiet splash

initrd        /boot/initrd.img-2.6.20-15-generic

quiet

savedefault
When deleting these entries, ensure that you are only deleting old kernel entries of a given OS and not entries from another OS such as Windows XP. It is also a good idea to backup your menu.lst file before you do any editing.
Filed under: dual boot, grub, linux, ubuntu | 1 Comment
System Monitoring for Linux
![]()
Conky is a light-weight system monitor that allows a user to quickly view their system status. The best part of using conky is the fact that you can see so much information and only sacrifice about 0.5MB (my current configuration). Using conky, you can monitor items such as CPU usage, memory usage, network activity, CPU/GPU/HDD temperatures and much more. Although when you run conky it shows up in its own window by default, the settings can easily be changed to allow the conky output to be written directly to your desktop wallpaper (click image below to see a screen capture).
To install conky in Ubuntu, open a terminal and type:
$ sudo apt-get install conky
$ zcat /usr/share/doc/conky/examples/conkyrc.sample.gz > ~/.conkyrc
Now just type “conky” (without the quotes) in the terminal to run the app. To customize your conky output, edit the file “.conkyrc” which can be found in your Home directory. For documentation of all available commands visit:
http://conky.sourceforge.net/docs.html
If you run into trouble visit the FAQ or search the Ubuntu forums (or post a comment).
http://conky.sourceforge.net/faq.html
*Note: It’s a bit tricky getting Conky and Beryl to play nicely, view the comments section to see my .conkyrc file along with workarounds.
Filed under: conky, desktop, linux, ubuntu | 1 Comment
Mobile Browsers

Most Windows Mobile devices come equipped with the default Microsoft browser, PIE (Pocket Internet Explorer). PIE is a typically a good browser if you access sites that are purely XHTML or you only visit sites that are intended to be viewed on mobile devices (WAP). Since most of the internet is not limited to XHTML and WAP sites, PIE is not a good choice for users that navigate the internet frequently on their WM device. Fortunately there are alternative solutions to choose from.
- Opera Mobile – Currently available in version 8.65beta as a free download until October. This browser renders pages much much faster than PIE and uses Small Screen Rendering technology to reformat webpages and images to fit nicely on your screen. The price of this browser is $24 USD and well worth the money considering some useful webpages (i.e. Bank) wouldn’t render at all in PIE. (Version 9 of Opera will support AJAX and Web 2.0)
- NetFront – Many people claim that NetFront is the best browser for mobile devices. The newest version supports the latest web standards including AJAX and has a very clean user interface. This was my browser of choice on the Dell Axim, but having moved on to a smaller screen on a smartphone I now prefer Opera Mobile because of Small Screen Rendering.
- Minimo – This is Mozilla’s current mobile browser. I have read good things about this browser but unfortunately it is currently only available on PocketPCs. I look forward to testing this browser when it becomes available for smartphones.
These are not the only options when it comes to mobile browsers, there are yet other browsers such as ThunderHawk which render webpages as they would be rendered on a desktop and provide full Java support.
No matter which browser you choose, it will be a step up from the default PIE browser and you will notice a significant difference in rendering time and your ability to comfortably navigate pages using the browsers mentioned above.
Filed under: browsers, minimo, mozilla, netfront, opera, smartphone, windows mobile | 2 Comments
![]()
Phone carriers like to make you think that when they get an exclusive phone that you can only use that phone on their wireless network. This is partly true. If you happen to be in the US and have T-Mobile or AT&T (formerly Cingular) you more than likely have a GSM* phone. What this means is that if you open the battery cover of your phone, there is a small card that you can pop out of your phone (SIM card). This card can be placed in another GSM phone and you will be good to go without having to activate your phone.
There is one catch though; this typically works only with phones from your own GSM carrier because each carrier makes their phones locked to work with their own SIM cards. Why do carriers do this? Money. Carriers typically charge much less than a third party vendor when it comes to purchasing handsets. Nevertheless, they plan to make up this difference through the service plans and add-ons you get from them.
As always there is a workaround. Most phones today can be “unlocked” to work with any carrier’s SIM. A google search of your phone’s model name and number along with the word “unlock” will bring up webpages and forums that show you how to unlock you phone, not to mention that several third party vendors sell phones unlocked. Once you have the unlocked phone, it is simple to get all the features working.
If you have T-mobile, the easiest way to get your device up and running quickly is to insert your SIM card into the phone and go to the T-Mobile Wireless Data Configurator (http://tmobileus.wdsglobal.com/phonefirst). Here you can select your phone from a wide range of phones and have the settings sent to the phone over the air without going through any menus and changing anything manually.
For phones that are not on the list it is still very easy to configure your settings. Your SIM card contains all the data needed to make voice calls and to send text messages. The only settings that remain to configure are your EDGE/GPRS settings for internet access (if you have an internet plan) and your MMS settings which are used to send picture/video messages. You can configure these settings by accessing the “Connections” menu. The following settings were used without any problems on an unlocked Samsung BlackJack:
EDGE/GPRS:
Connects to: The Internet
Access Point: wap.voicestream.com
User name: ‘blank’
Password: ‘blank’
Primary DNS: 0.0.0.0
Secondary DNS: 0.0.0.0
IP address: ‘blank’
MMS:
Connects to: WAP Network
Access Point: wap.voicestream.com
User name: ‘blank’
Password: ‘blank’
Primary DNS: 0.0.0.0
Secondary DNS: 0.0.0.0
IP address: ‘blank’
*GSM stands for Global System for Mobile Messaging. The alternative to this wireless standard is the CDMA wireless standard which is used by carriers such as Verizon and Alltel.
Filed under: blackjack, EDGE, MMS, samsung, SIM, t-mobile | 65 Comments
Review of Samsung BlackJack

About a month ago my T-Mobile MDA (HTC Wizard) finally crapped out as a result of water damage from almost a year ago and wouldn’t stay on for more than 15 seconds. Knowing I didn’t want to go back to a regular phone, I looked at my options through T-Mobile; they had the Dash and the SDA (MDA was no longer carried in anticipation for the release of the Wing, and the Wing was not out yet). I needed a phone that day so ebay and online retailers were not an option. I did not want the SDA because I really like having a full keyboard when typing text messages/ emails and the aesthetics of the Dash were not appealing to me. So I called up WirelessToyz (www.wirelesstoyz.com) in Mesa and asked them if they could unlock a Samsung Blackjack for me and to my luck, they had one already unlocked in stock.
I was a bit weary of switching from a PDA to a smartphone, I thought it would be harder to navigate and control the device without a large touchscreen and so I drove over to the store and tried the phone out. After playing with it for a couple minutes I realized it was just as easy to use as a full sized PDA and the best part was that it actually fit in my pocket (The phone has the same thickness as a Motorola RAZR and is about 1/3” taller and 1/4” wider). Another issue I was concerned with was how well a Cingular phone would work on the T-Mobile network. The sales guy let me put in my SIM, the device made phone calls and texts on the T-Mobile network right out of the box without any problems. However, to get MMS and GPRS/EDGE settings to work took a couple minutes but nothing difficult at all.
After changing these two settings, the phone was fully functional. I have had the phone for about a month now and I use it regularly for phone calls, text messaging, emails and internet browsing without any problems (I will discuss email and internet browsing in later posts).
The battery life is pretty good on this phone. I charge the phone every night and I can go through a day’s use without a problem. I have never seen the battery meter drop below halfway but then again I am probably a light user, with a maximum of 2 hours of talk time in a given day but plenty of text, internet and email. The phone comes with 2 batteries, the regular sized battery and an oversized battery so if you are a heavy user or out on the road, you should be good to go.
One problem I have had with this phone is that when I receive a phone call, for the first 1-2 seconds after I answer, the other party can’t hear me. This usually results in me answering the phone saying “Hi” followed by silence and me saying “Hi” again. Another issue to consider is that the phone does not have Wifi but it makes up for this by incorporating 3G which is much higher speed than EDGE (Note T-Mobile users: Cingular phones will not work on T-Mobile’s 3G network since the carriers use different frequencies for their networks).
One last thing to consider is this phone’s Bluetooth capability. It will work fine with a Bluetooth headset however, if you have a Bluetooth enabled car, make sure this phone is compatible. This phone’s Bluetooth stack is not compatible with many automobiles (I’ve tested it on the BMW 530i but have heard about this problem on other BMWs, Audis and Acuras). The fact that Samsung used a different Bluetooth stack means that you are still able to make and receive calls through your car’s communication screen, however you can not choose contacts from your contact list to call (Must dial number manually) and you only see the person who is calling’s phone number (no name from contact list). I have heard rumors of the Bluetooth stack being changed in the next ROM update (Which will include WM6) but we will have to wait and see.
Overall I am very satisfied with this phone and would recommend it to anyone who needs to be connected throughout the day. Stay tuned for more posts about the WM6 ROM update and useful Windows Mobile apps.
Filed under: blackjack, BMW, samsung, smartphone, t-mobile, windows mobile | 10 Comments
